EcoPoste’s installation process for passive safety poles, including collapsible poles, collapsing poles, breakaway poles, and yielding poles, is meticulously designed to ensure maximum safety and efficiency.
This guide provides a comprehensive overview of the installation steps for EcoPoste’s innovative safety poles, which are crucial for maintaining road safety standards.

Installation steps for single and multi-post Ecoposte safety systems
For Small Signs on Single Posts
Step 1: Preparing the Foundation
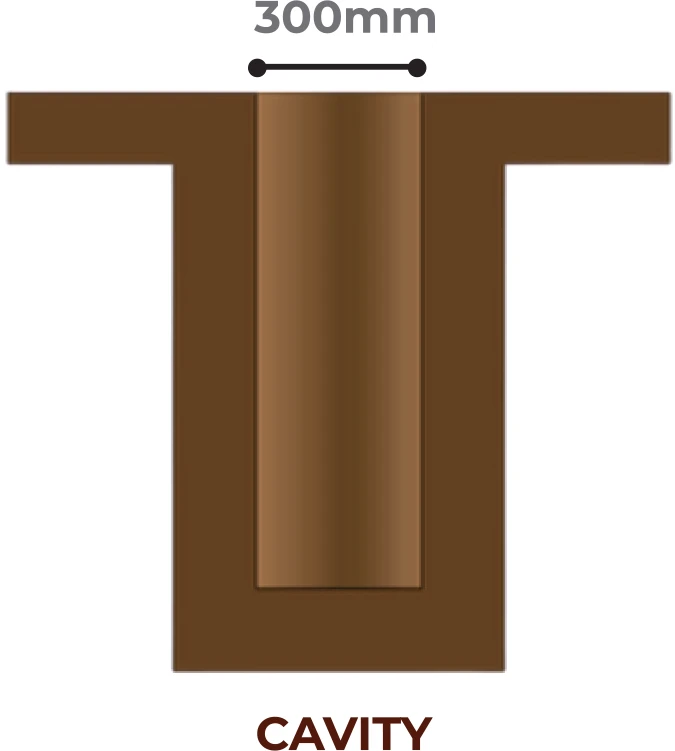
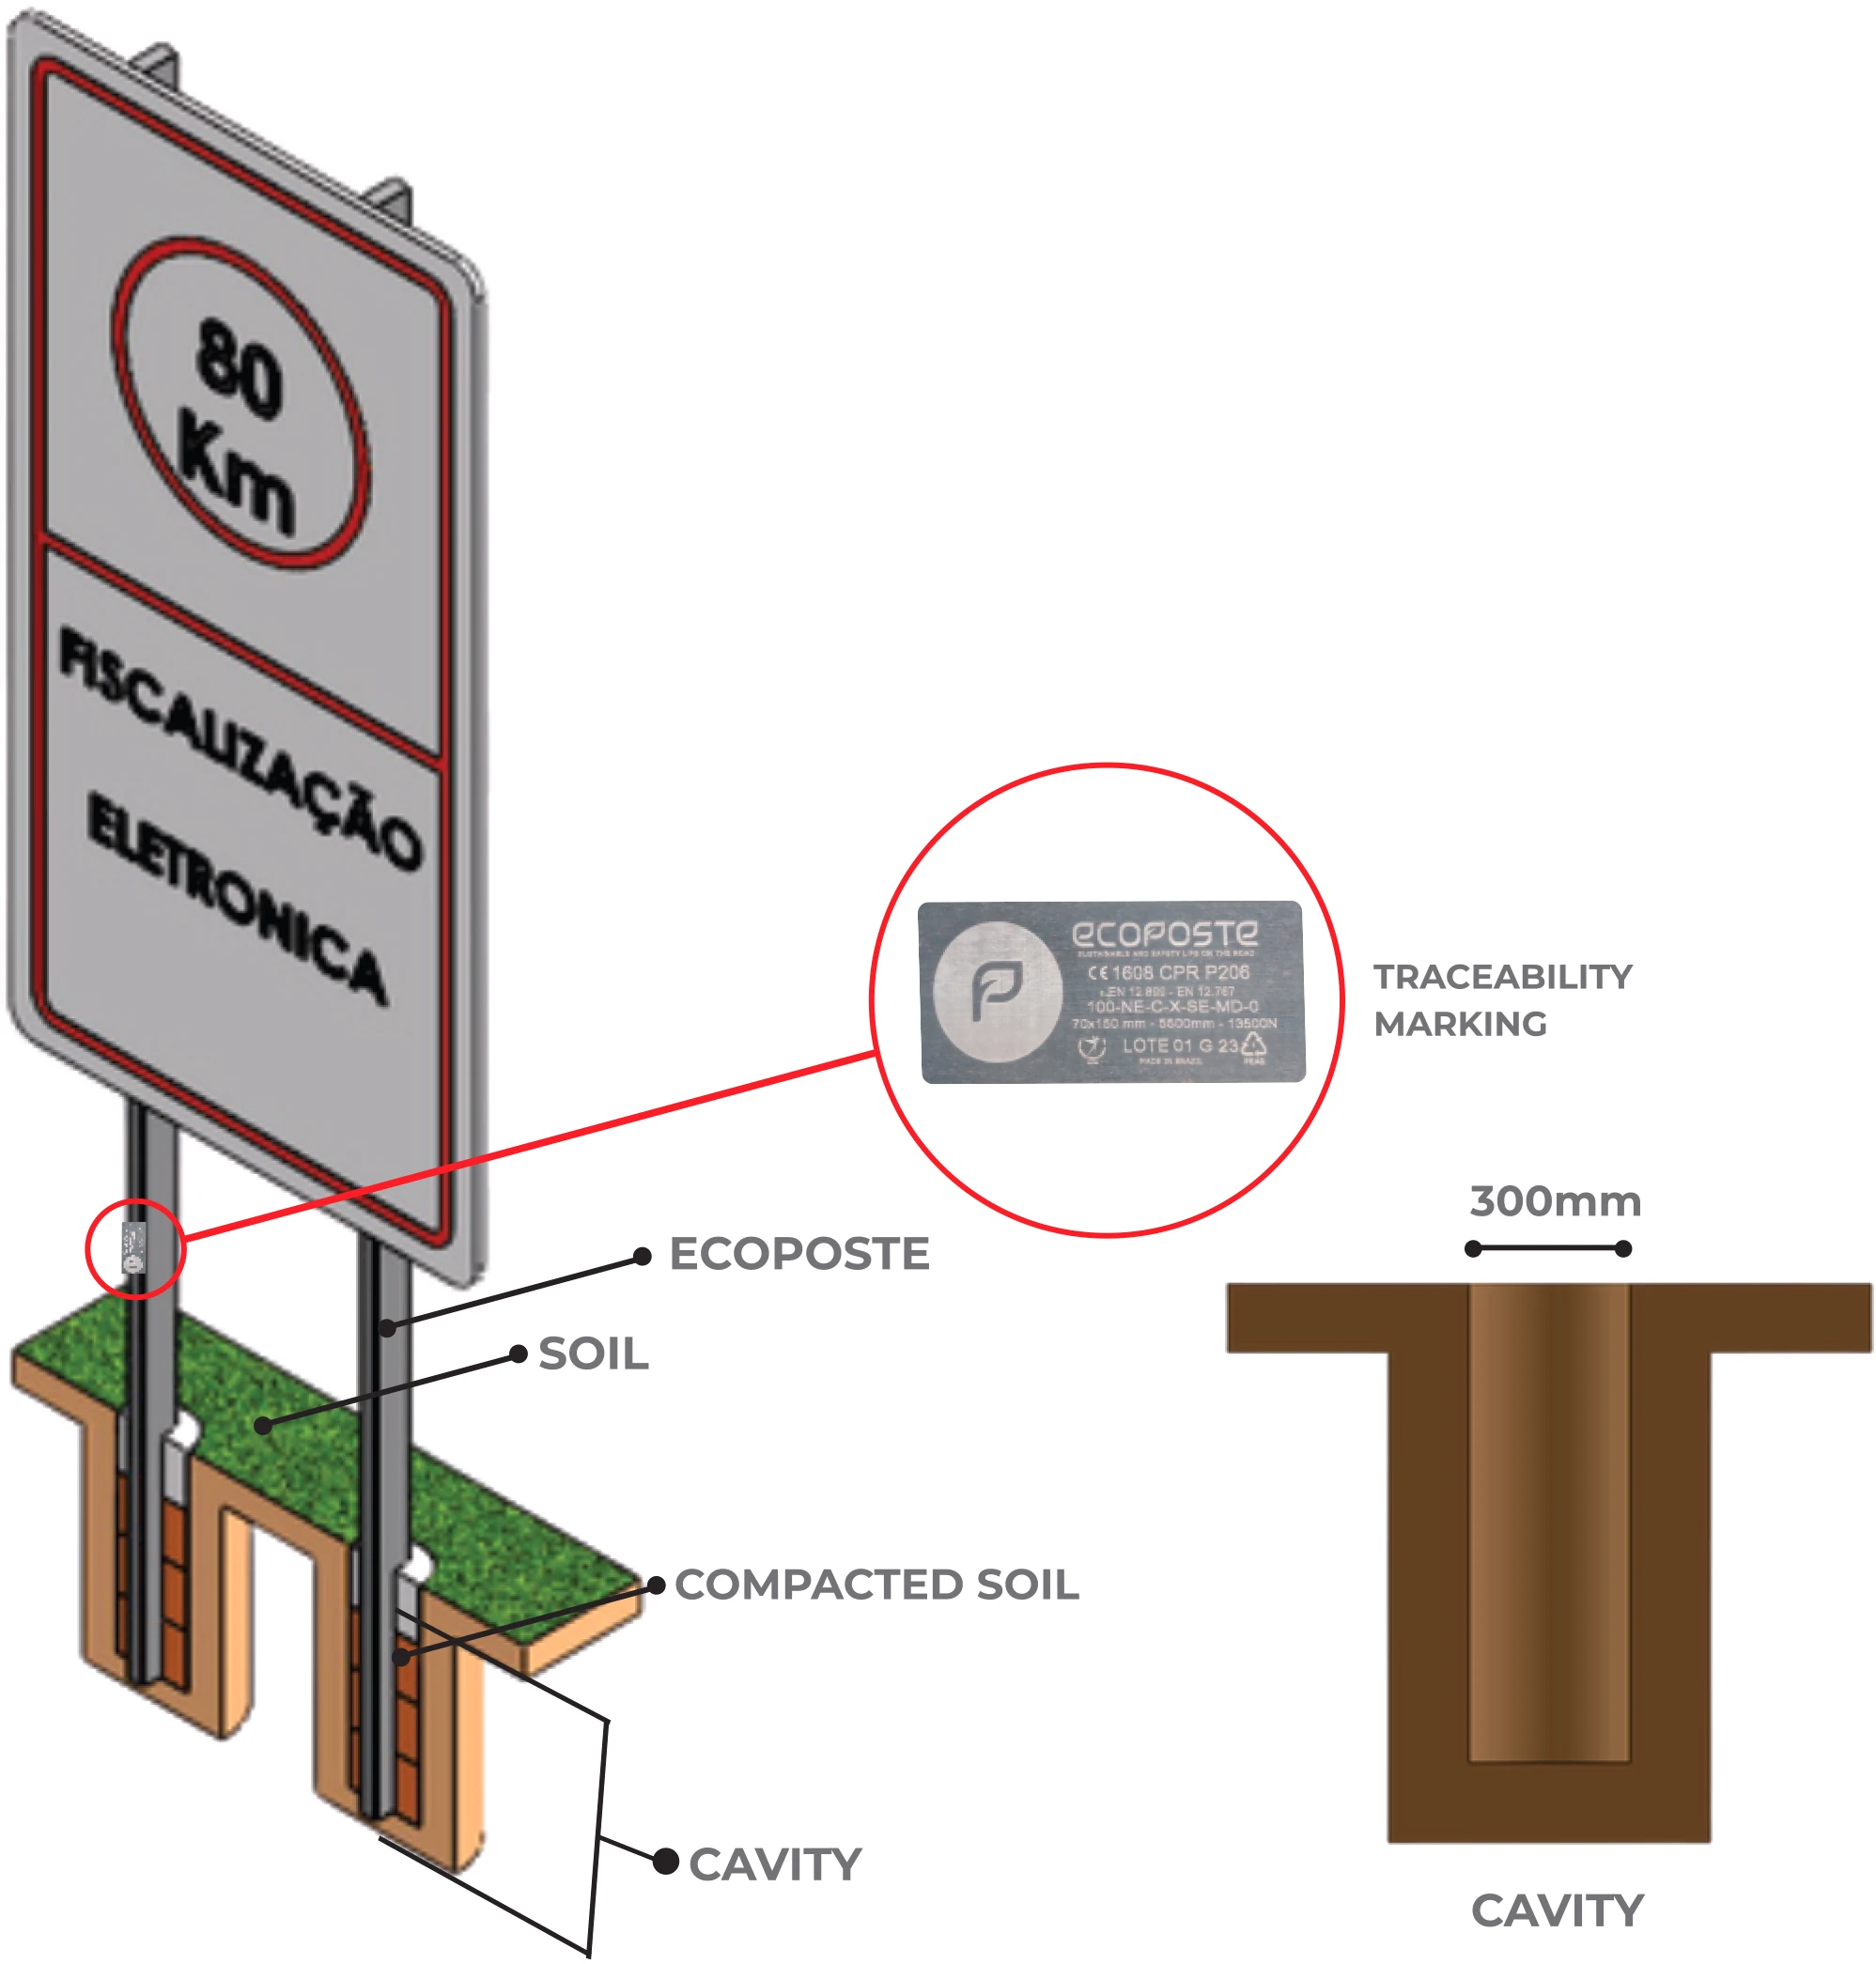
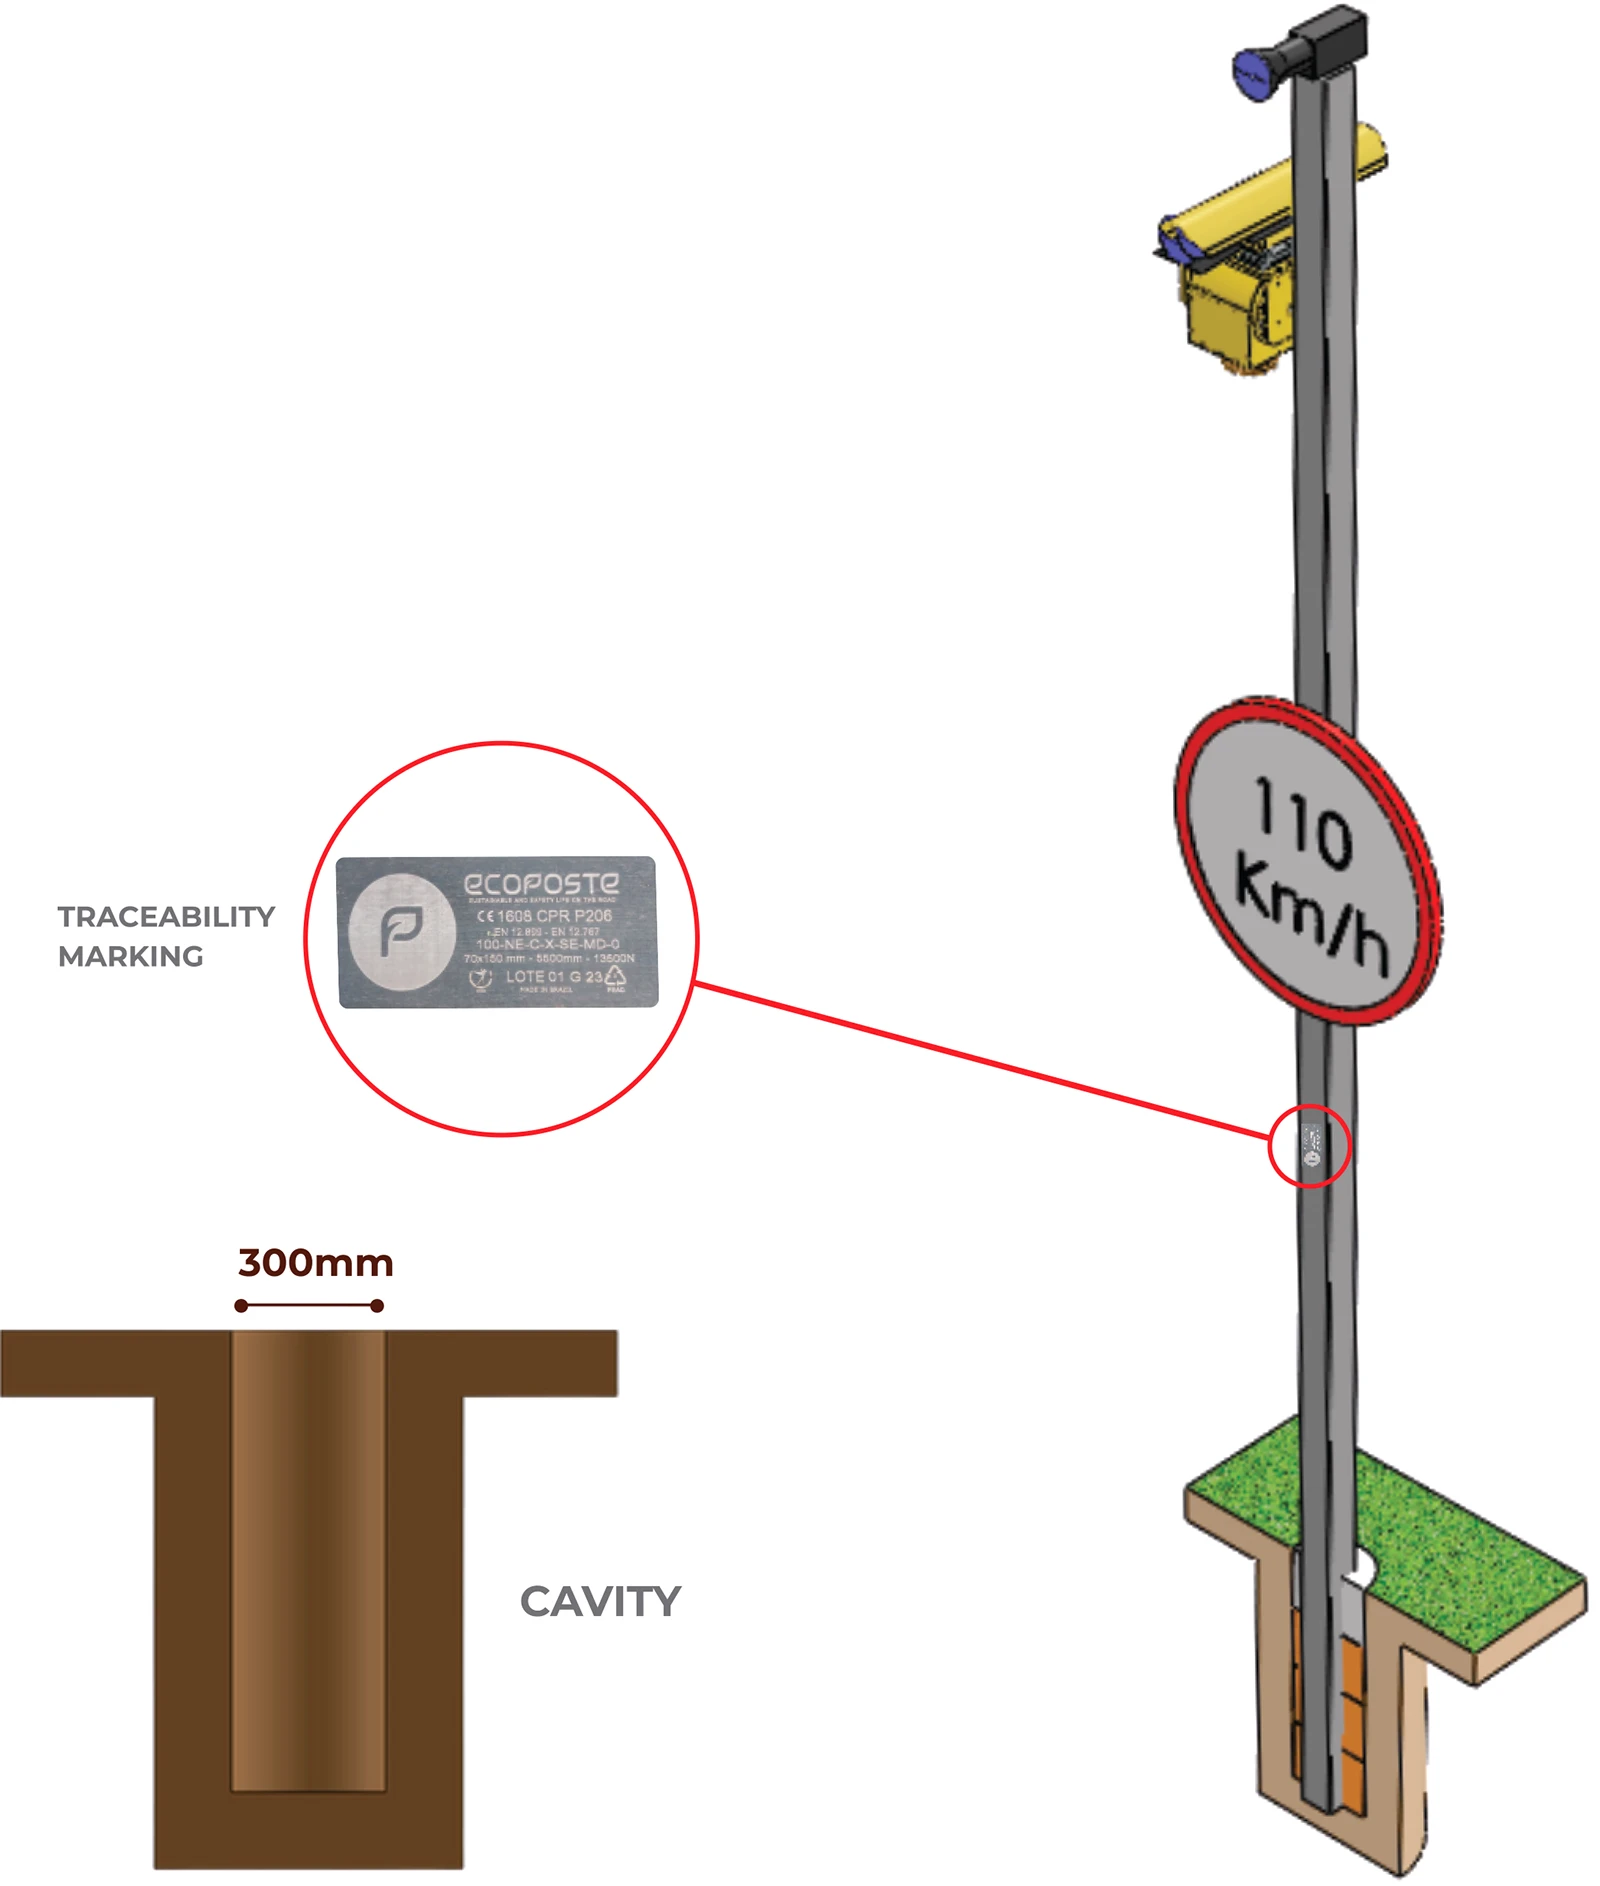
- Cavity Dimensions: Ensure the creation of a cavity with a depth and diameter tailored to the post size, typically around ⌀300mm in diameter and 800mm to 900mm deep. Consult the sizing table for precise measurements.
Step 2: Securing the Sign
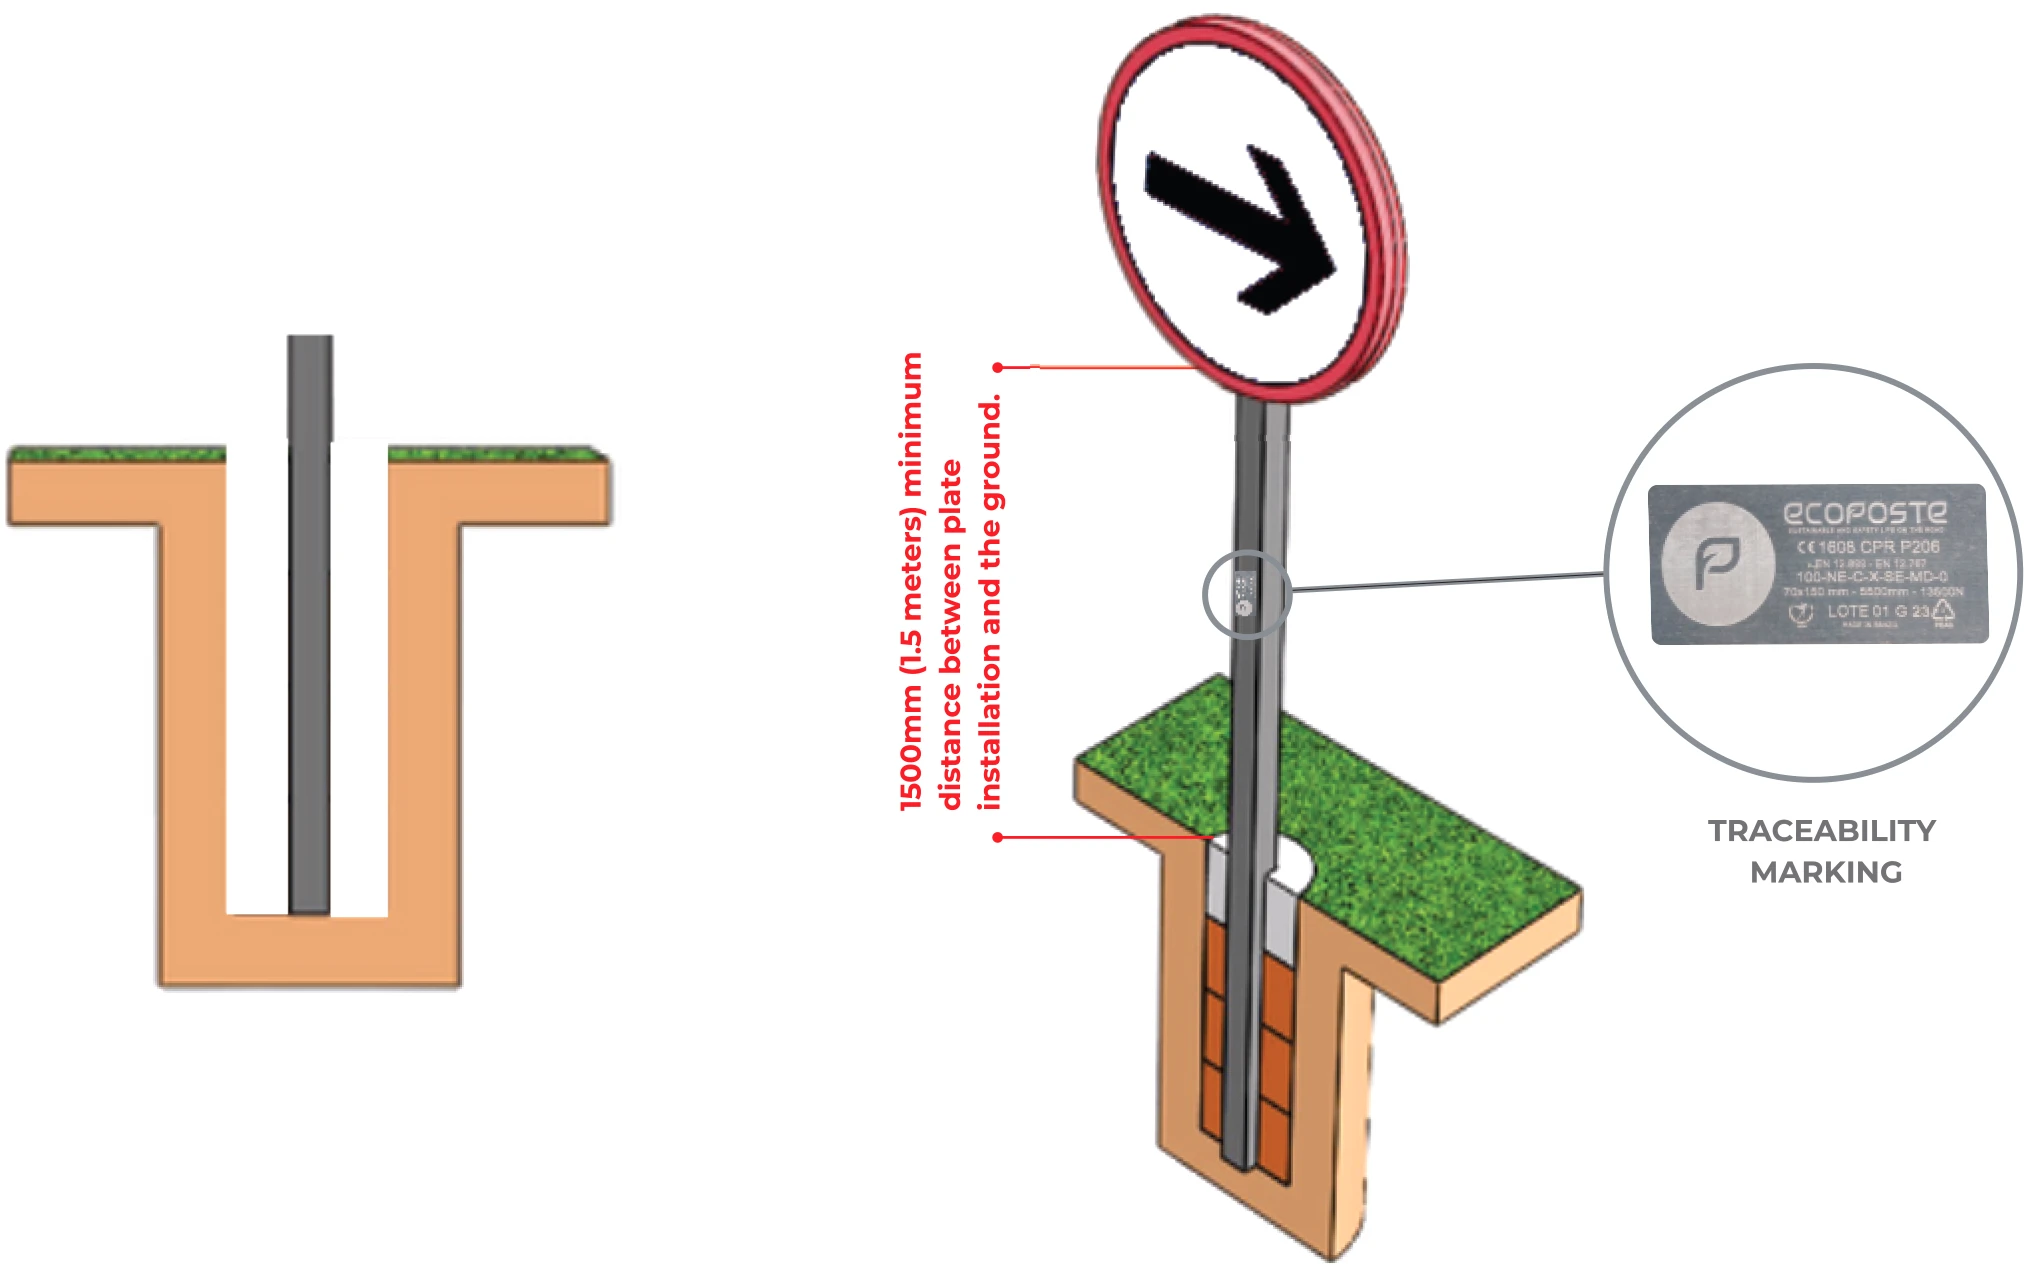
- Ensure the sign is firmly attached to the passive safety pole to prevent detachment during impact. The pole should be buried at the correct height, with its traceability marking facing the roadway for easy identification.
Step 3: Finalizing the Installation
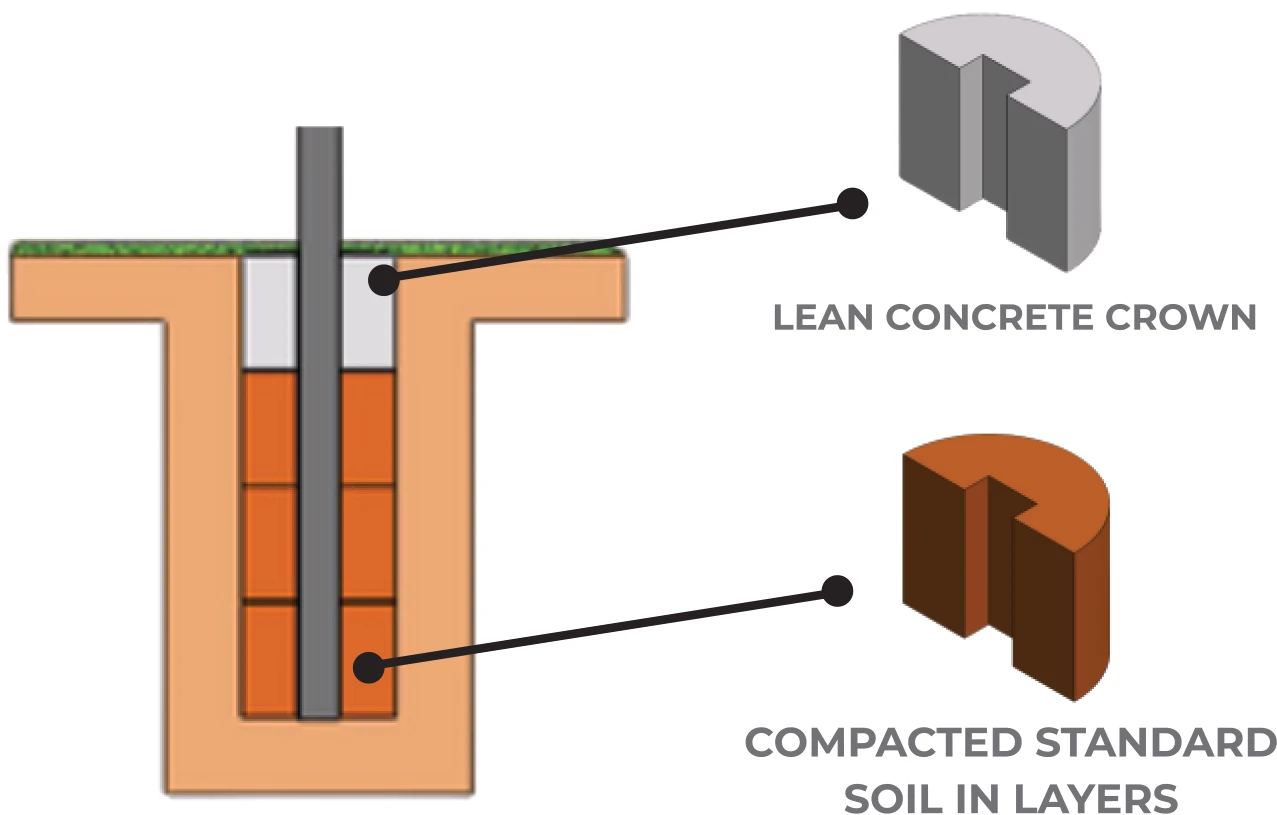
- Fill and compact the soil around the pole as per the guidelines. In atypical soil conditions, reinforce with soil-cement or a lean concrete crown for enhanced stability.
- Soil Compaction: Follow strict soil layer compaction guidelines to maintain the collapsible pole’s performance, even if the cavity diameter exceeds 300mm.
For small or medium signs on multiple posts (max 6 sq.mt*)
Steps 1 to 3:
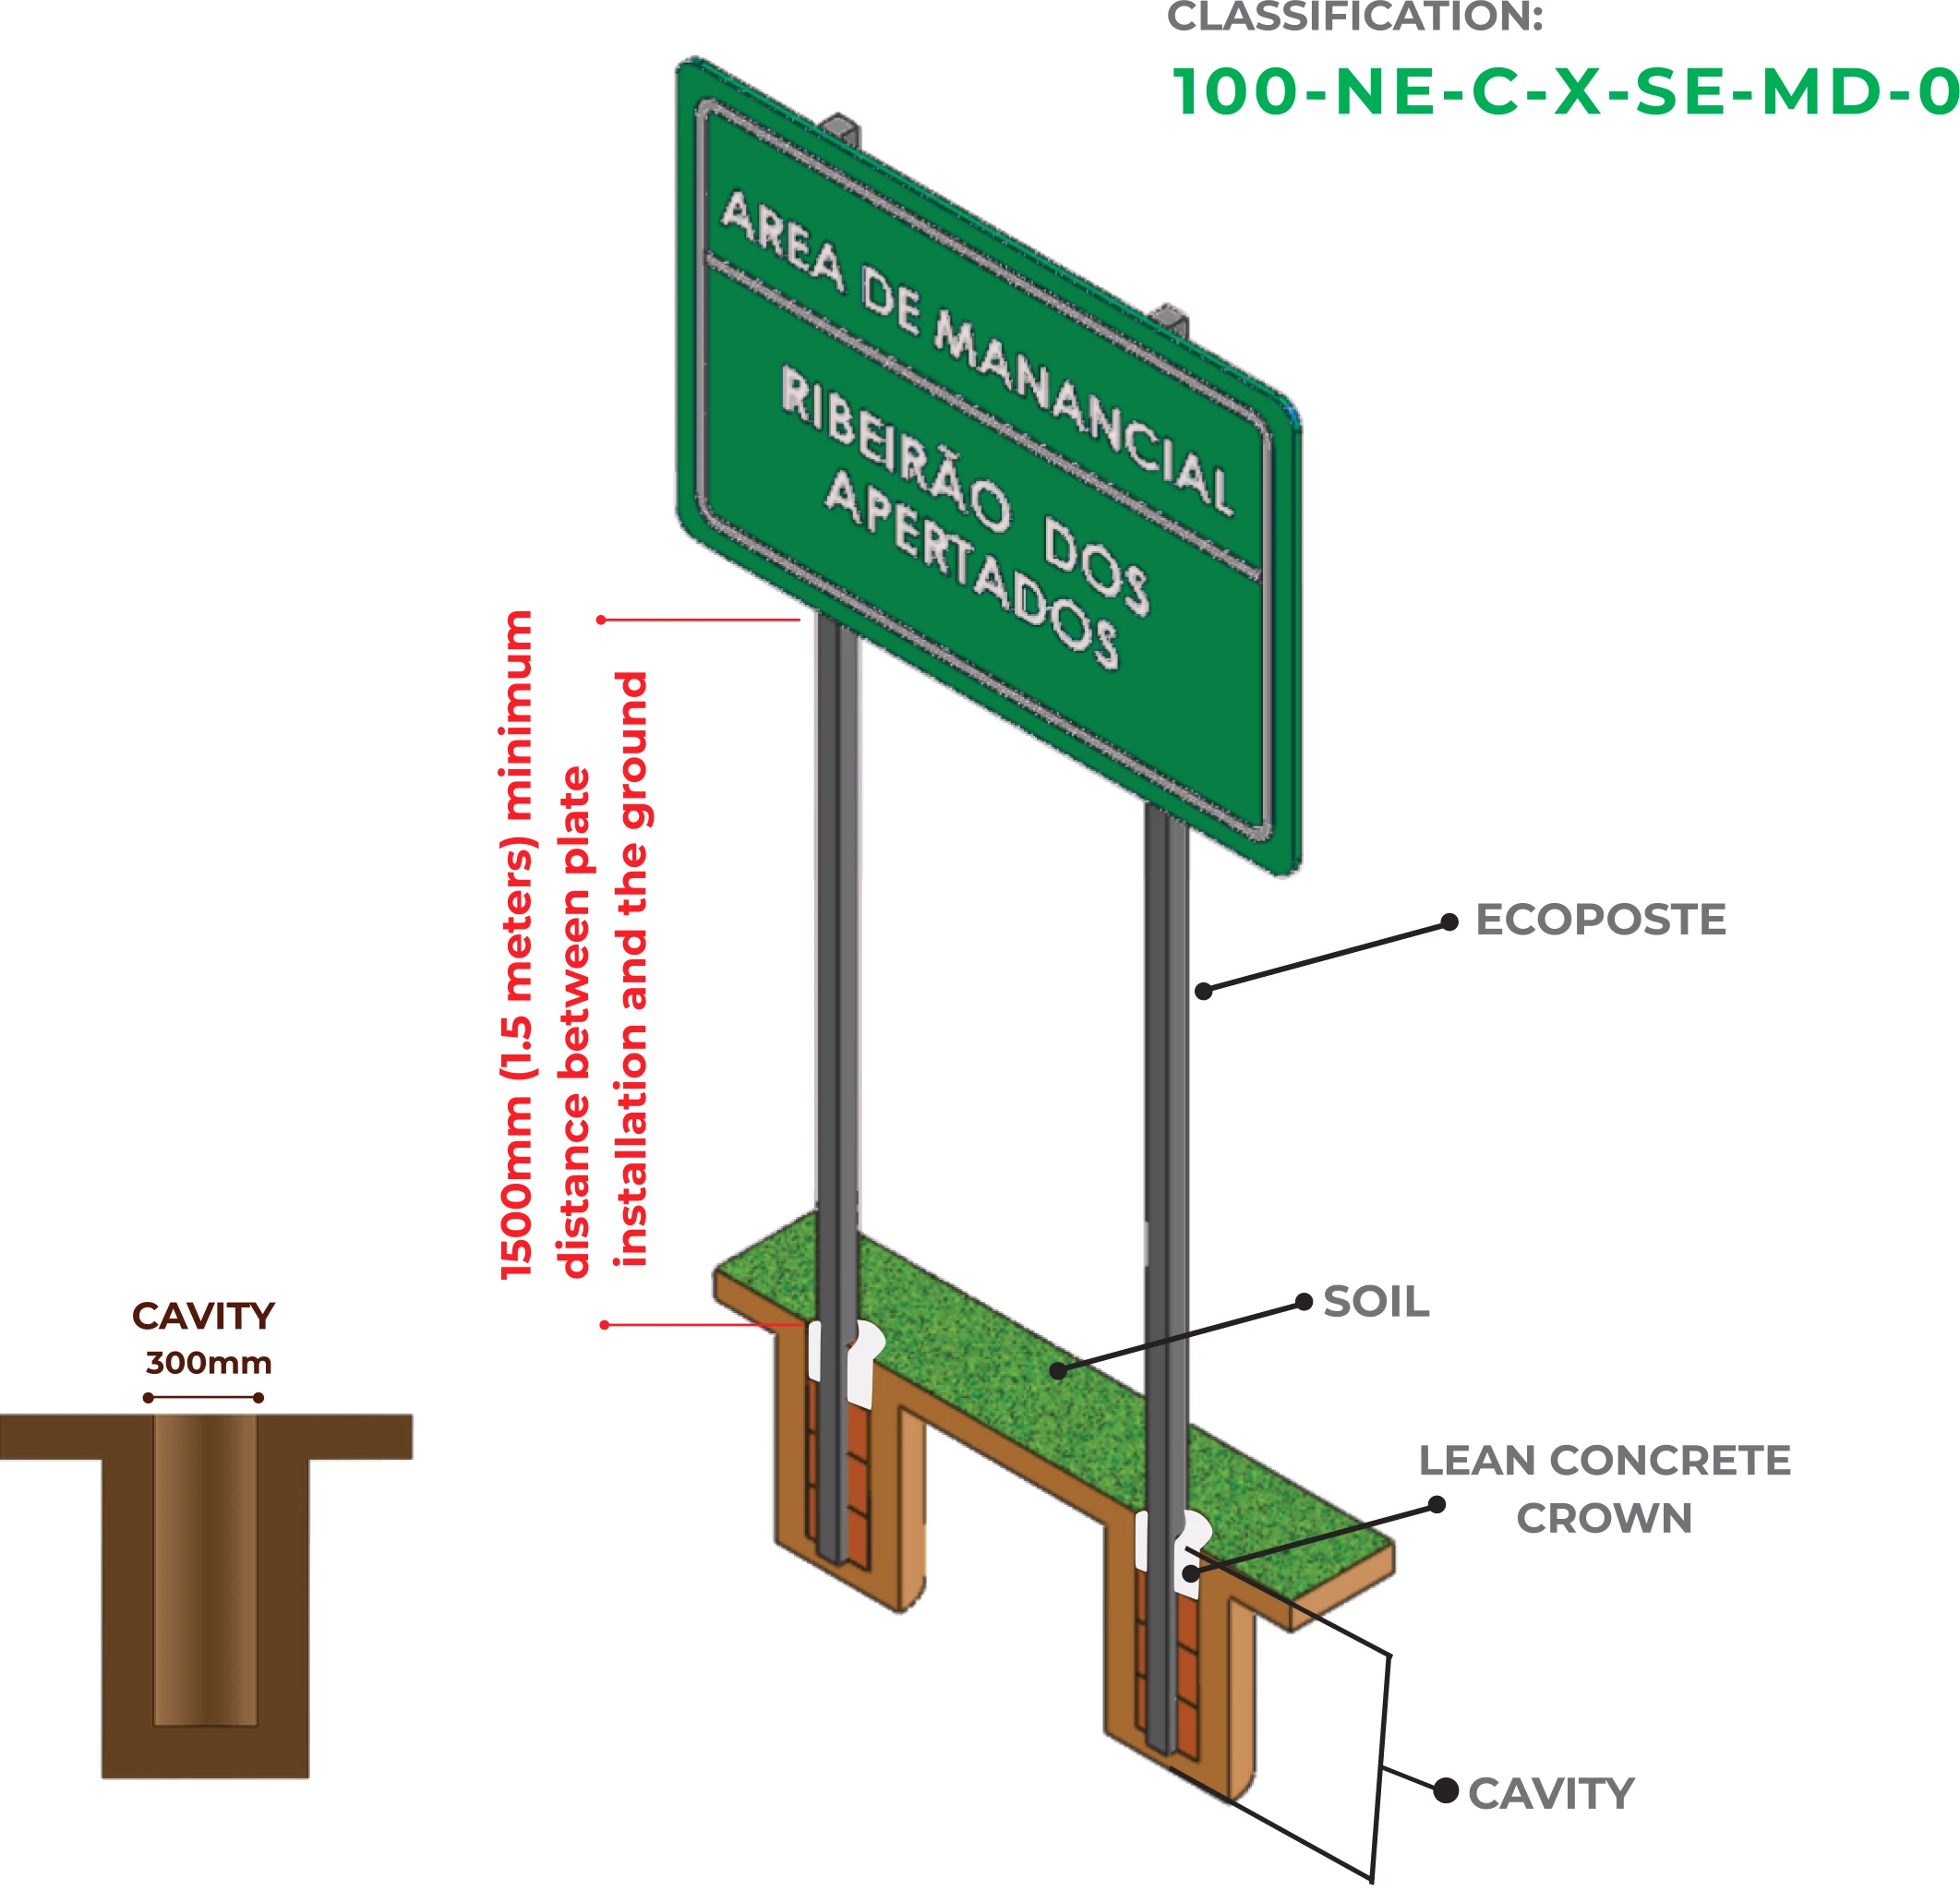
- Follow similar steps as for single posts, ensuring proper cavity preparation, sign fixation, and soil compaction, topped with a lean concrete crown. For multiple posts, no minimum distance is required between them, and the use of EcoPoste Certified Fixation, while recommended, is not mandatory.
For large signs on multiple posts (> 6 square meters*)
Step 1: Cavity Preparation
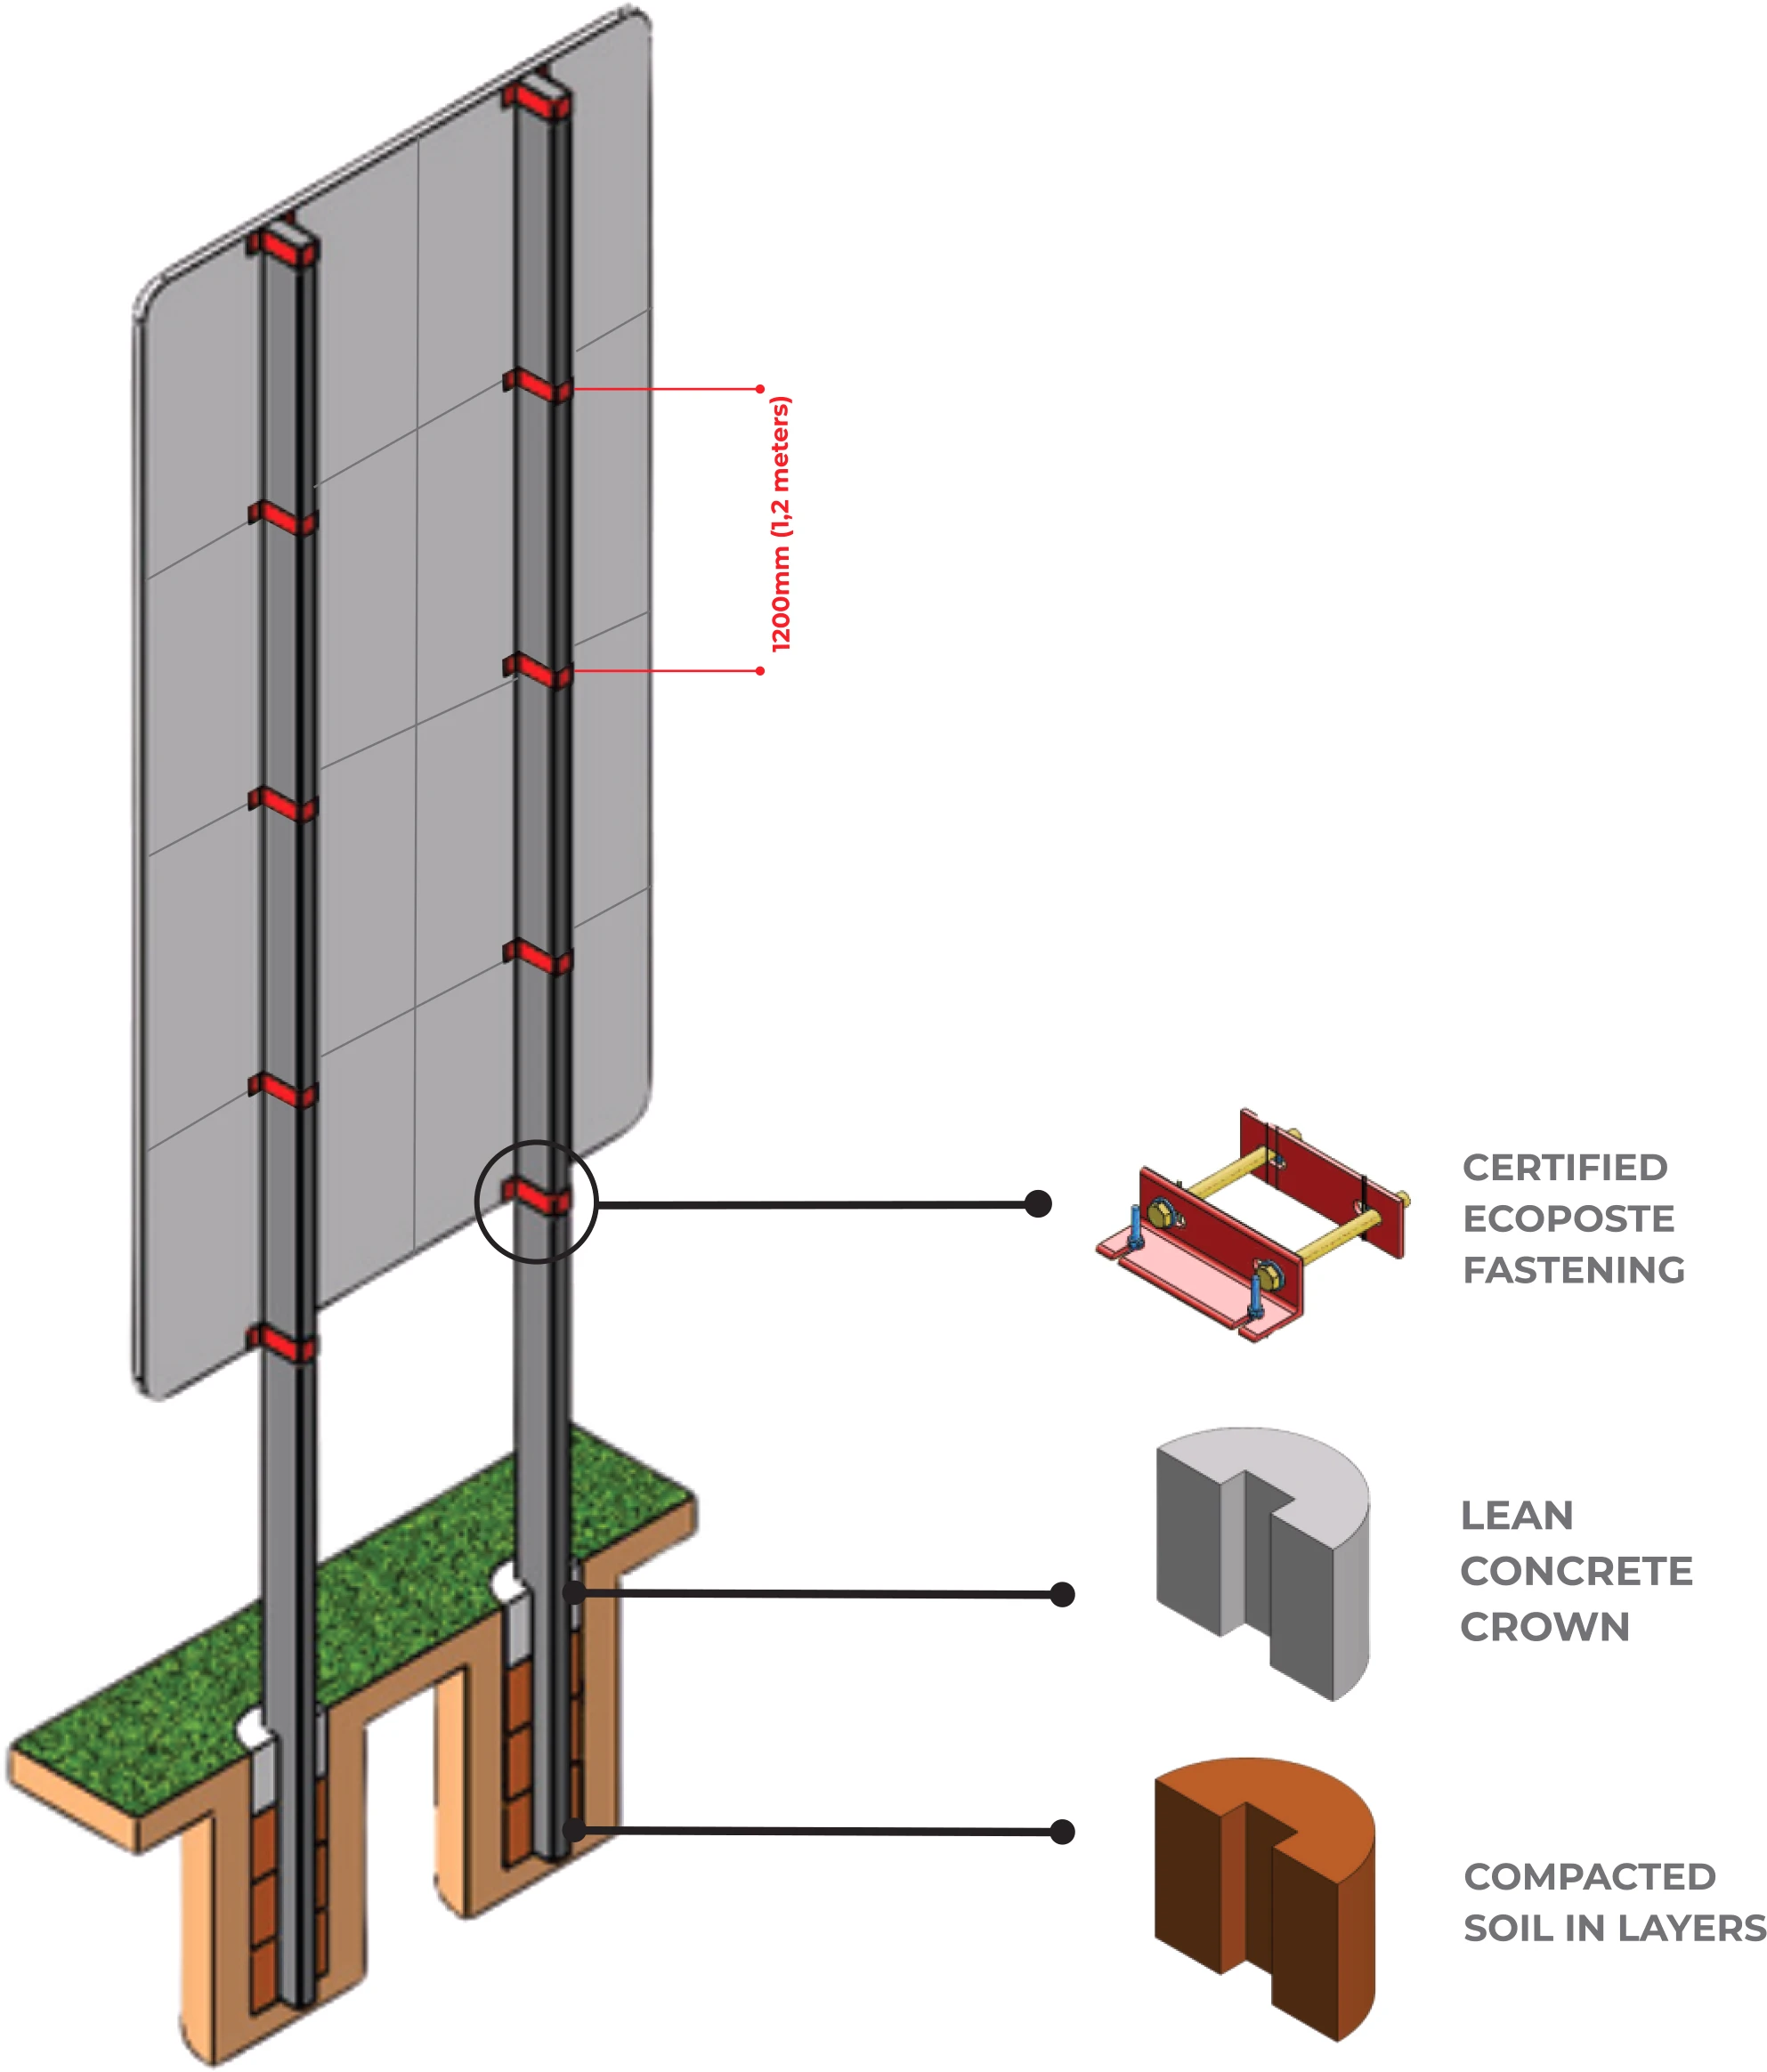
- Large Signs: For larger signs, cavities should be approximately ⌀300mm in diameter but deeper, ranging from 1000mm to 1200mm. Always consult the sizing table for accurate depth requirements.
Step 2: Sign Fixation
- Use a certified collapsing pole fixation system to secure the sign, ensuring it aligns with highway regulations and is properly leveled.
Step 3: Soil Compaction and Final Touches
- Fill the cavities with compacted soil, topped with a lean concrete crown. Ensure that all contact points with the sign are securely fixed using the EcoPoste certified fixation system, applying the recommended torque.
* sign areas are referential only.
Special notes for Ecoposte fixing:
- Certified Fixing: Installation of certified EcoPoste fixing is crucial for posts with specific dimensions, enhancing the safety and reliability of the yielding poles.
This guide underscores the importance of following precise installation steps for passive safety poles, ensuring they perform effectively as a critical component of road safety infrastructure. By adhering to these guidelines, installers can guarantee that EcoPoste’s poles provide the highest level of safety and sustainability on the road.
Installing extreme-sized signs on passive safety poles (> 9sq.mt with 12x12cm posts)
Step 1: Preparation of the Foundation
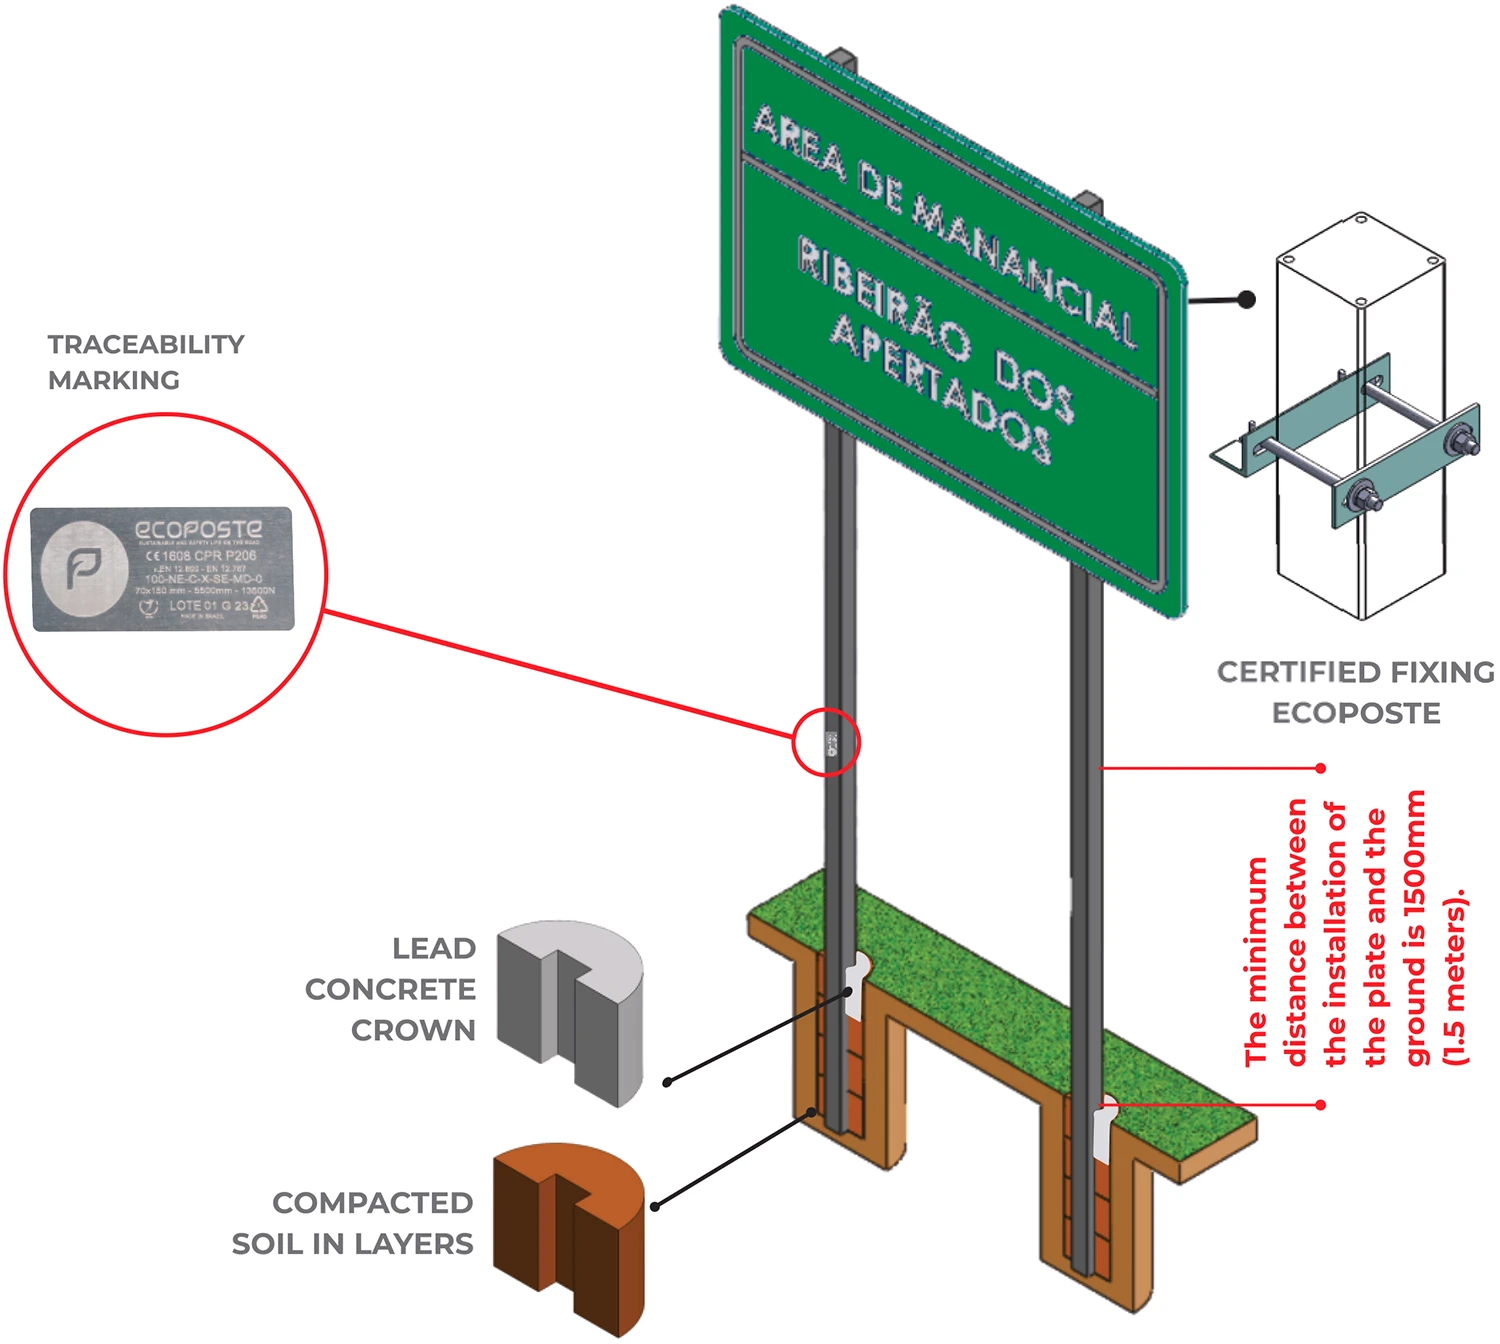
- Cavity Specifications: For extreme-sized signs, it’s crucial to dig a cavity approximately ⌀300mm (30cm) in diameter, with a depth of 1000mm to 1200mm, depending on the pole size. Always refer to the sizing table for accurate depth measurements.

Step 2: Securing the Sign
- Utilize a certified collapsible pole fixation system to affix the sign. The poles should be spaced at least 1600mm (1.6 meters) apart, correctly buried, and aligned according to highway standards. The traceability marking on the post must face the roadway for easy identification.
Step 3: Filling and Compacting
- Backfill the cavities with soil, compacting each layer with the final layer being a lean concrete crown, as detailed in the manual. For two-support installations, secure the sign at all contact points with the certified EcoPoste fixation, using the recommended torque settings for all screws.
Step 4: Fixing Installation
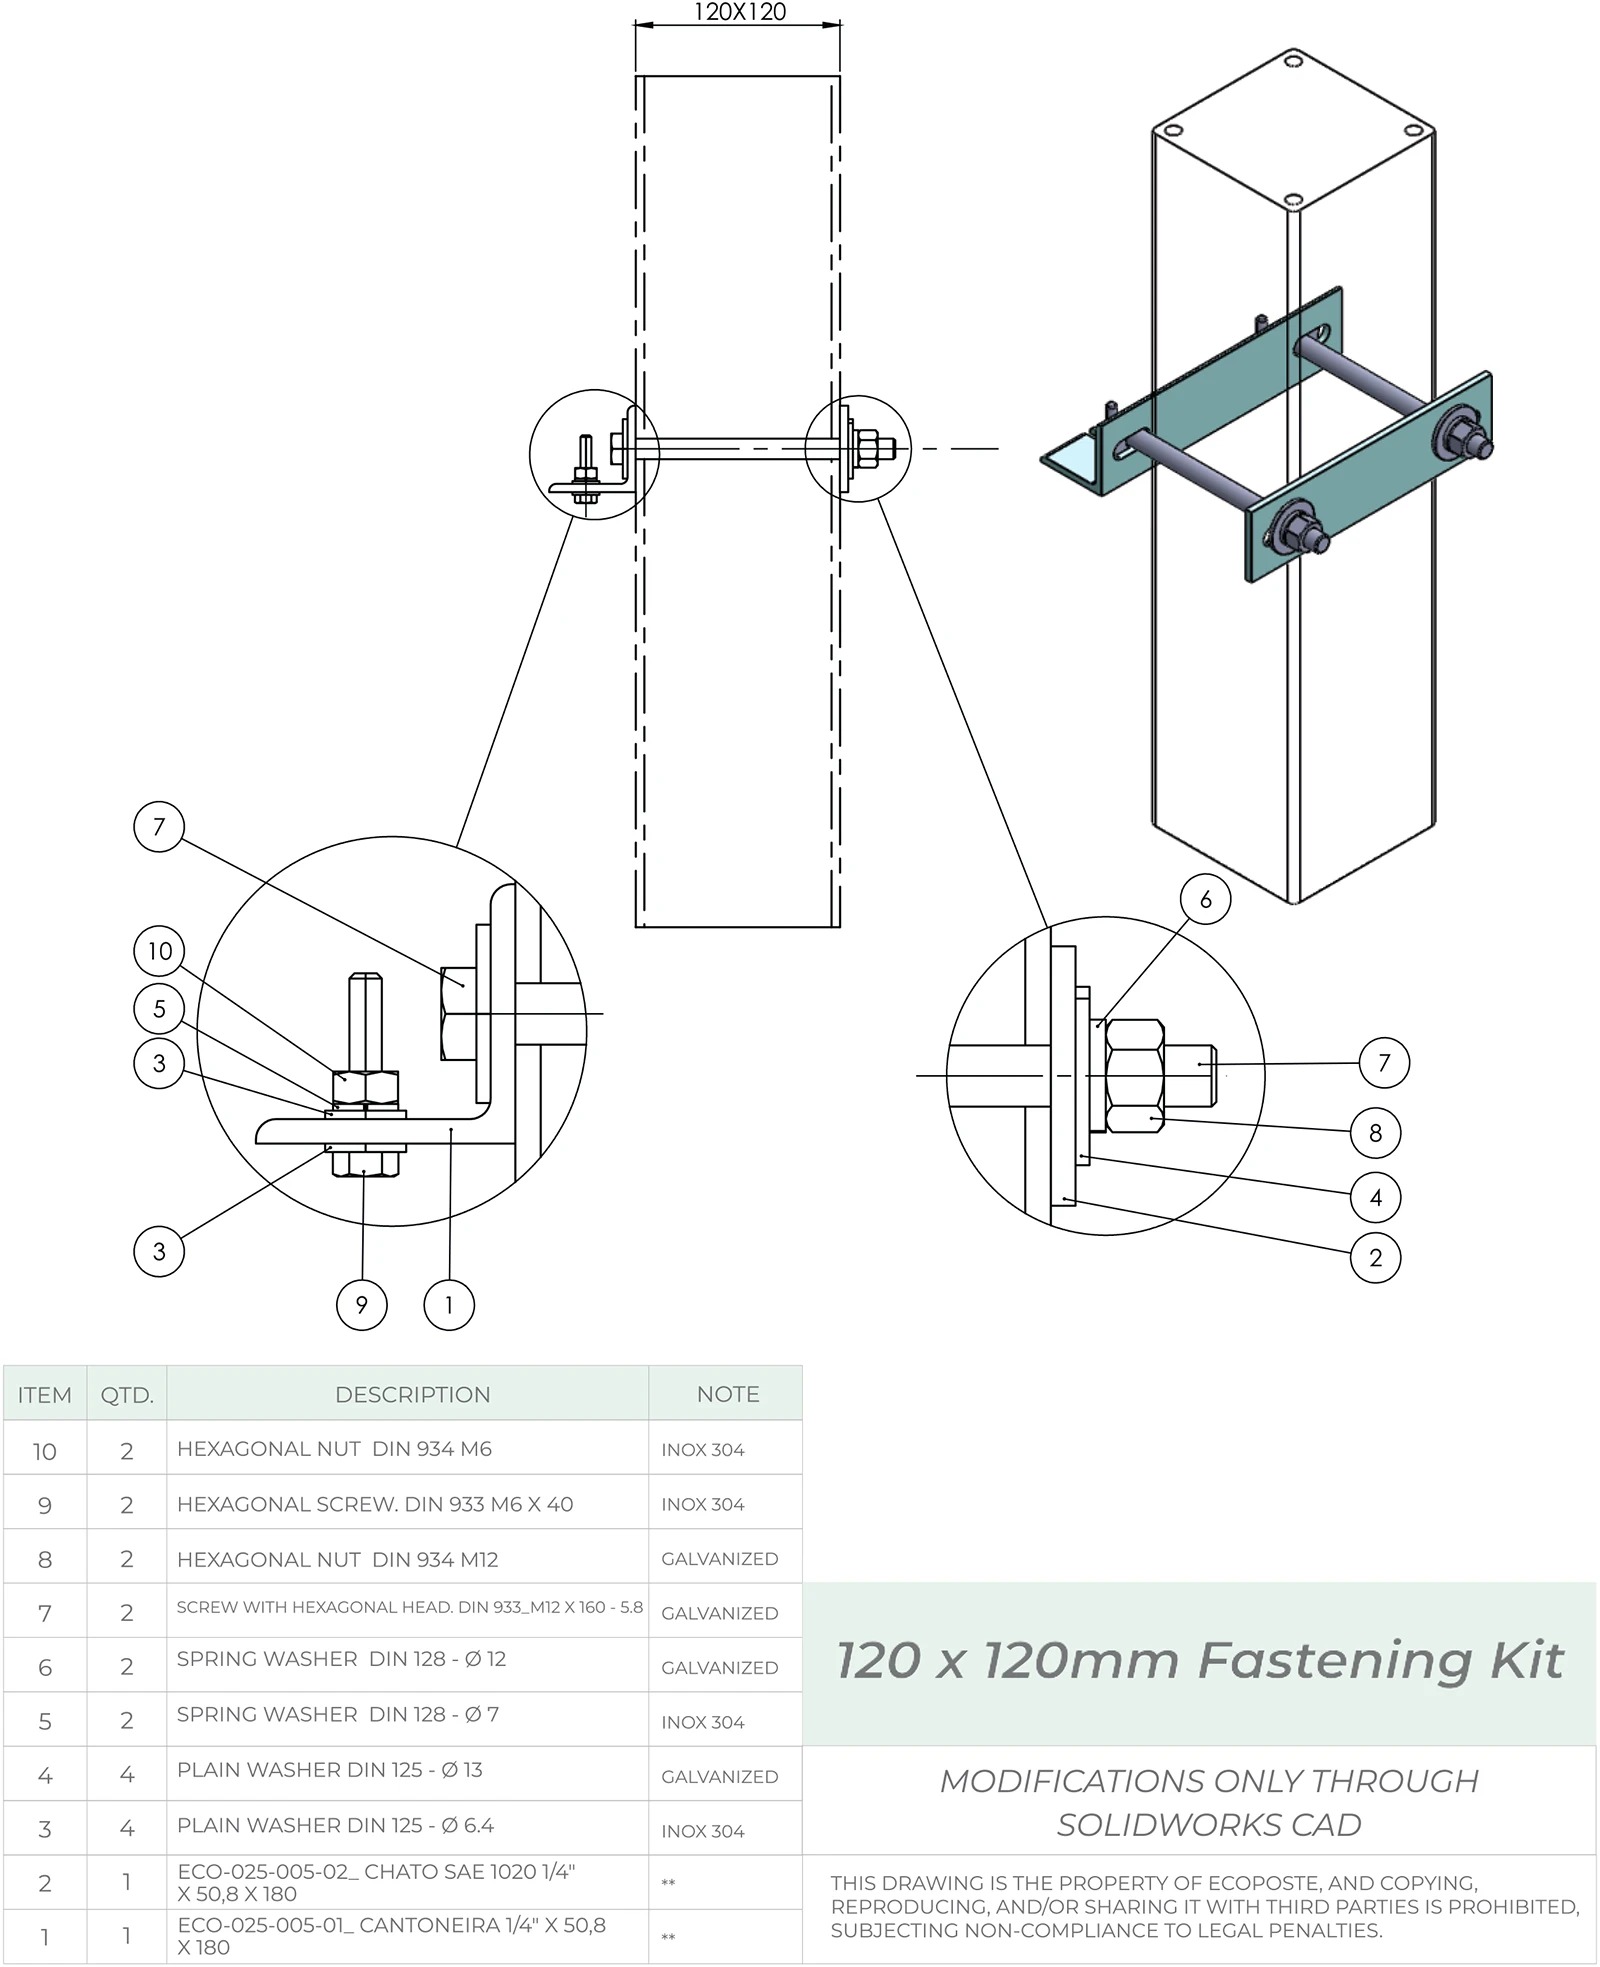
- For posts measuring 120 x 120mm, apply the Certified EcoPoste Fixing, ensuring enhanced stability and safety for extreme-sized signage.
Installation guidelines for utility poles
Step 1: Foundation Preparation
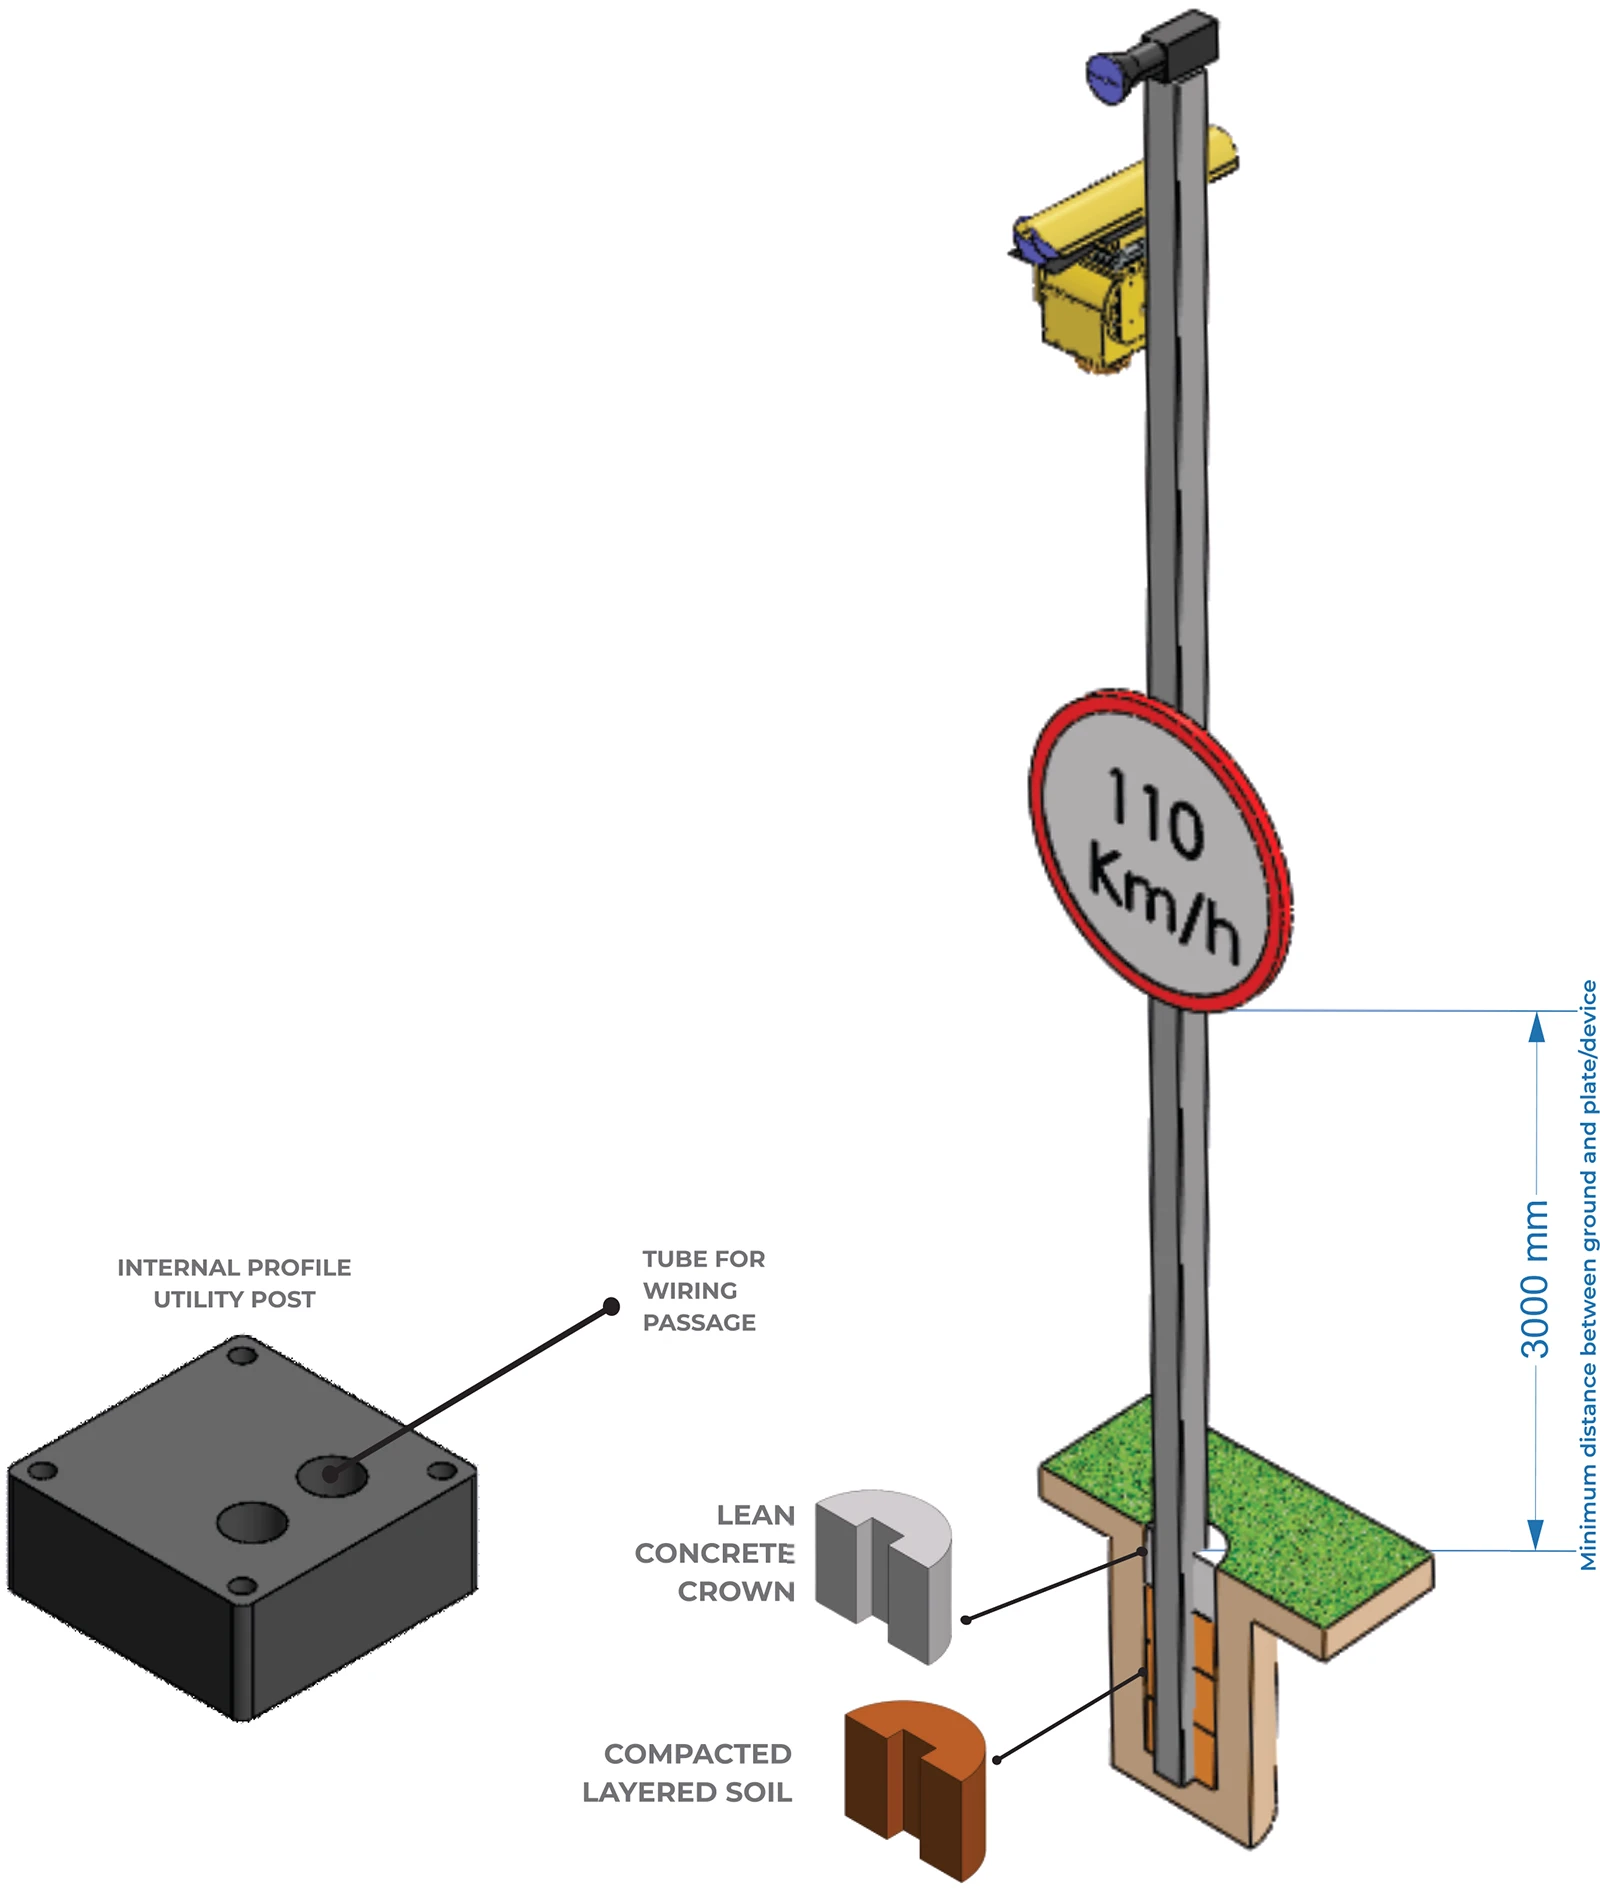
- Similar to sign installation, ensure the creation of a cavity suitable for the utility pole’s size, typically around 300mm in diameter and 1000mm to 1200mm deep, consulting the sizing table for exact dimensions.
Step 2: Post and Device Fixation
- Assess the post’s dimensions to understand its weight capacity. For 120x120mm posts, the limit is up to 115kg, and for 100x100mm posts, up to 65kg. Install the utility devices securely, maintaining a minimum ground clearance of 3000mm (3 meters) for the lowest device or sign.
Step 3: Soil Filling and Compaction
- Fill the excavated areas with soil, compacting it layer by layer, and finish with a lean concrete crown. Ensure all devices or signs are installed at or above the 3000mm mark for optimal safety and visibility.
By adhering to these guidelines, installers can ensure that collapsible poles, collapsing poles, breakaway poles, and yielding poles are installed correctly, promoting road safety and the effective use of utility poles for various applications.
